Signing commits for GitLab using GnuPG on macOS
Programming Estimated reading time: ~5 minutes
git is a free and open source distributed version control
system designed to handle everything from small to very large projects with speed and efficiency.
In this article you will learn how to setup git to sign your commits
using GnuPG (GPG) and how to properly configure GitLab
to deal with those signed commits.
The first question you might want to ask is why it is a good idea to sign
your commits. Well, git makes it easy to impersonate someone. As
long as you have write access to a repository you can push commits
to it and git will use whatever email address you have configured
in the Author and Commit fields:
$ git config user.name "Bill"
$ git config user.email "bill@microsoft.com"
$ git commit -m "Just fixing a few bugs."
$ git log --graph --all --decorate --format=fuller

<...>
* commit 672bd6365845e3cb4cdb9721e7681d1bd1193ed9
| Author:     Bill <bill@microsoft.com>
| AuthorDate: Wed Aug 10 10:40:57 2022 +0200
| Commit:     Bill <bill@microsoft.com>
| CommitDate: Wed Aug 10 10:40:57 2022 +0200
|
|     Just fixing a few bugs.
<...>

$
So signing your commits allows you to validate who actually created a commit. To sign commits you have to perform some configuration steps, both on your local machine and on GitLab.
Before starting with the actual configuration steps let’s recapitulate how GnuPG signatures work. A GnuPG key pair consists of a private and a public key. You must keep the private key secret as it is used by GnuPG to create signatures. Your public key can then be used by anyone to verify your signatures. Thus, you can make your public key available to anyone. Basically GnuPG uses asymmetric cryptography (Public-key cryptography) to create and validate signatures.
Now let’s start with the actual configuration. The first step is to install GnuPG on your macOS:
$ brew install gnupg
After this you can create a private/public GnuPG key pair by executing the following command:
$ gpg --full-gen-key
Enter the following details:
- Option
Please select what kind of key you want:- You can use the default here (
(9) ECC (sign and encrypt) *default*)
- You can use the default here (
- Option
Please select which elliptic curve you want:- You can use the default here (
Curve 25519 *default*)
- You can use the default here (
- Option
Please specify how long the key should be valid.- Choose whatever option you prefer.
- Option
Real name:- e.g.
Christoph
- e.g.
- Option
Email address:- Here you have to enter the email address you are actually
using on GitLab. For instance
christoph@microsoft.com. The address entered here must match exactly the email address of your GitLab account.
- Here you have to enter the email address you are actually
using on GitLab. For instance
- Option
Comment:- For corprate use cases you can enter the name of your department
here.
developmentfor instance.
- For corprate use cases you can enter the name of your department
here.
Finally the wizard will ask you the enter a passphrase to
protect your private key. By default, the gpg-agent will keep
your passphrase cached for 2 hours.
GnuPG will use the given real name, email address and comment to create a user ID. This user ID can then be used later on to identify the key. The details provided above will result in the following user ID:
Christoph (development) <christoph@microsoft.com>
An important property of the generated keypar is the key ID. You can retrieve it using the command given below:
$ gpg --list-secret-keys --keyid-format LONG
gpg: checking the trustdb
gpg: marginals needed: 3  completes needed: 1  trust model: pgp
gpg: depth: 0  valid:   1  signed:   0  trust: 0-, 0q, 0n, 0m, 0f, 1u
sec   ed25519/xxxxxxxxxxxxxxx 2022-05-15 [SC]
      yyyyyyyyyyyyyyyyyyyyyyyyyyyyy
uid                 [ultimate] Christoph (development) <firstname@microsoft.com>
ssb   cv25519/yyyyyyyyyyyyyy 2022-05-15 [E]
In the output above the key ID is xxxxxxxxxxxxxxx. If you need to change
any configuration parameter later on (passphrase, expiration time, …)
you can use the gpg --edit-key <key ID> command.
In order to be able to add your public key to GitLab you need to export it first:
> gpg --armor --export xxxxxxxxxxxxxxx
-----BEGIN PGP PUBLIC KEY BLOCK-----
<...>
-----END PGP PUBLIC KEY BLOCK-----
To actually add the public key to GitLab perform the following steps in the GitLab web interface:
- In the top-right corner, select your avatar.
- Select
Preferences. - On the left sidebar, select
GPG Keys. - Paste your public key into the
keytext field. Do not forget to include theBEGIN PGP PUBLIC KEY BLOCKandEND PGP PUBLIC KEY BLOCKlines. - Finally click the
Add keybutton.
Now you can configure git to sign all your commits using the private
key you just created:
$ git config --global user.signingkey xxxxxxxxxxxxxxx
$ git config --global commit.gpgsign true
Finally add the following line to your ~/.zshrc file:
// file ~/.zshrc
export GPG_TTY=$(tty)
Otherwise you might get an error message telling you Inappropriate ioctl for device
when trying to sign a commit.
If everything is setup correctly, your next commit should be tagged as verified in GitLab web interface:
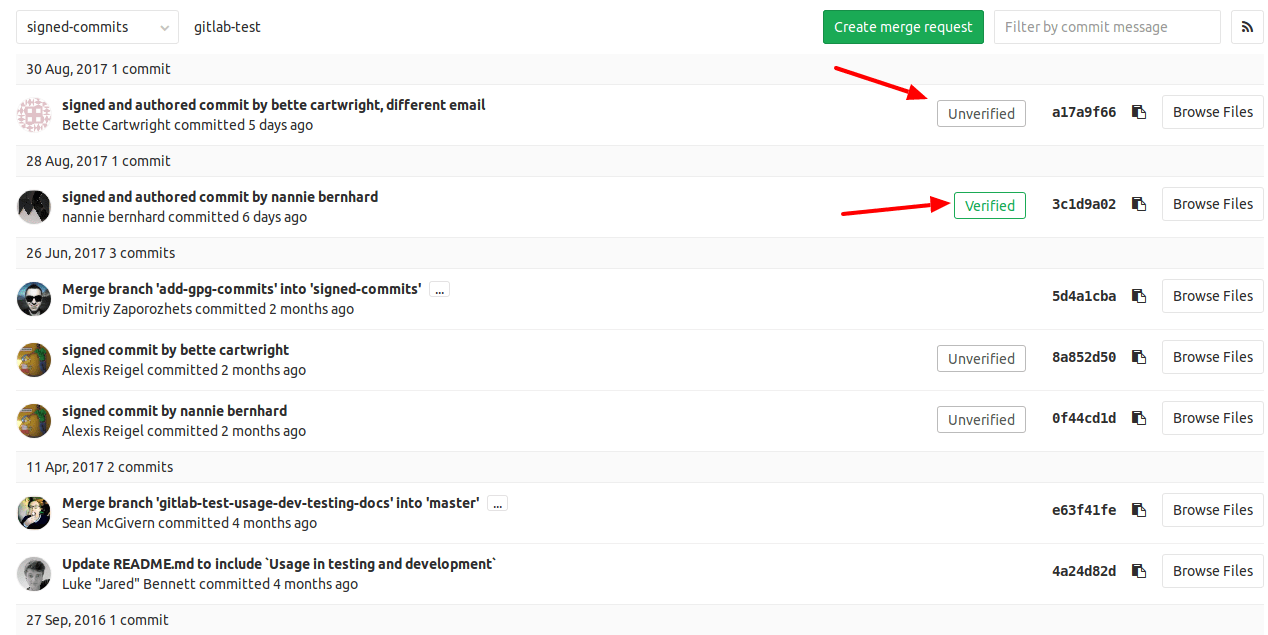
How unsigned, unverified and unsigned commits are shown in the GitLab Web UI.
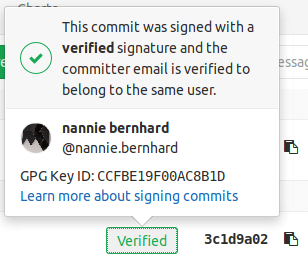
Details of a verified signature.
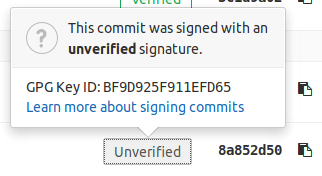
Details of an unverified signature.
Troubleshooting
You can run the following command to test if gpg has been configured
in a correct way:
$ echo "foobar" | gpg --clearsign
Backup & Restore your GnuPG keys
# backup
$ gpg -o christoph-microsoft-com-expires-2023-10-20-backup.gpg \
    --export-options backup --export-secret-keys <key id>

# restore
$ gpg --import-options restore --import-options keep-ownertrust \
    --import christoph-microsoft-com-expires-2023-10-20-backup.gpg
Creating signatures using SSH keys
As of September 2022, Gitlab supports only GnuPG keys for signing. Therefore you cannot use your SSH keys (as it is supported by GitHub). You can track the progress to add support for SSH signed commits to GitLab over here.
A note about Netcup (advertisement)
Netcup is a German hosting company. Netcup offers inexpensive, yet powerfull web hosting packages, KVM-based root servers or dedicated servers for example. Using a coupon code from my Netcup coupon code web app you can even save more money (6$ on your first purchase, 30% off any KVM-based root server, ...).